
This easy no-bake mascarpone tart with fresh fruit is creamy, elegant, and incredibly simple to make.
The smooth mascarpone filling and no-bake crust come together quickly, and you can top it with any seasonal fruit. A perfect make-ahead dessert for entertaining or everyday moments.
I love desserts that feel a little special without requiring a lot of effort, and this tart is exactly that. Similar to my Mascarpone Mousse, it's surprisingly easy to make—the filling is silky, the crust is so satisfying, and the fresh fruit topping makes it feel bright and celebratory.
The best part? You can play with the toppings depending on the season: fresh berries, a mix of colorful fruits… and when fall comes around, I can’t resist making the apple-and-coffee version (trust me, it’s so good).
It’s simple, adaptable, and always feels a little bit fancy when it hits the table. Let's make it!
Why You'll Love This Recipe
- No Oven Required: This is the perfect dessert when you want something impressive without turning on the oven. Everything comes together with simple steps and a quick chill.
- Flavorful, Satisfying Crust: The tart shell has a rich, caramel-like sweetness from dates and a warm nuttiness from the nuts and oats. A touch of salt and fresh ginger brightens and balances the flavors.
- Creamy Mascarpone Filling: The mascarpone mixture is luxuriously smooth, with just a subtle hint of amaretto (optional), adding depth without overpowering the fresh fruit.
- Adaptable and Seasonal: You can top it with whatever fresh fruit is in season. Mixed berries in summer, bananas, or try the cozy apple-coffee variation below.
- Make-Ahead Friendly: Once assembled, the tart chills and firms in the refrigerator, making it a stress-free option for entertaining, celebrations, or when you simply want a dessert that feels a little bit special.
Ingredients & Notes
See the recipe card for full information on ingredients and quantities.
Ingredients for the Tart Shell:
The crust is chewy, mildly sweet, with refreshing gingery notes. Here's what you need:

- Cashews and Pumpkin Seeds: This blend creates the best flavor and texture—creamy from the cashews and lightly earthy from the pumpkin seeds. They absorb the vanilla and ginger beautifully without overpowering the mascarpone filling.
- Medjool Dates: These act as both a natural sweetener and binder, as in my Pumpkin Spice Energy Balls, giving the crust a caramel-like flavor and helping it press together without baking.
- Steel-Cut Oats: They add chewiness, nuttiness, and structure, making the crust hearty without feeling heavy. Use leftovers to make my Steel-Cut-Oats Granola.
- Fresh Ginger: Just a small amount adds warmth, brightness, and balance, keeping the sweetness in check.
- Vanilla Extract and Salt: Vanilla rounds out the flavors, while a bit of salt sharpens and balances the dates' natural sweetness.
Ingredients for the Mascarpone Filling:
Two simple ingredients will turn into a delightfully creamy filling with the right amount of sweetness. The Amaretto is optional!

- Mascarpone Cheese: It gives the filling its silky, rich texture and subtle sweetness. Look for high-quality brands like BelGioioso or Whole Foods Farmstead if available.
- Coconut Sugar: This adds gentle sweetness and a light caramel depth without overpowering the filling.
- Amaretto (optional): Just a splash adds warmth and flavor complexity. It’s subtle—not strong—and simply enhances the mascarpone mixture rather than dominating it.
Ingredients for the Toppings:
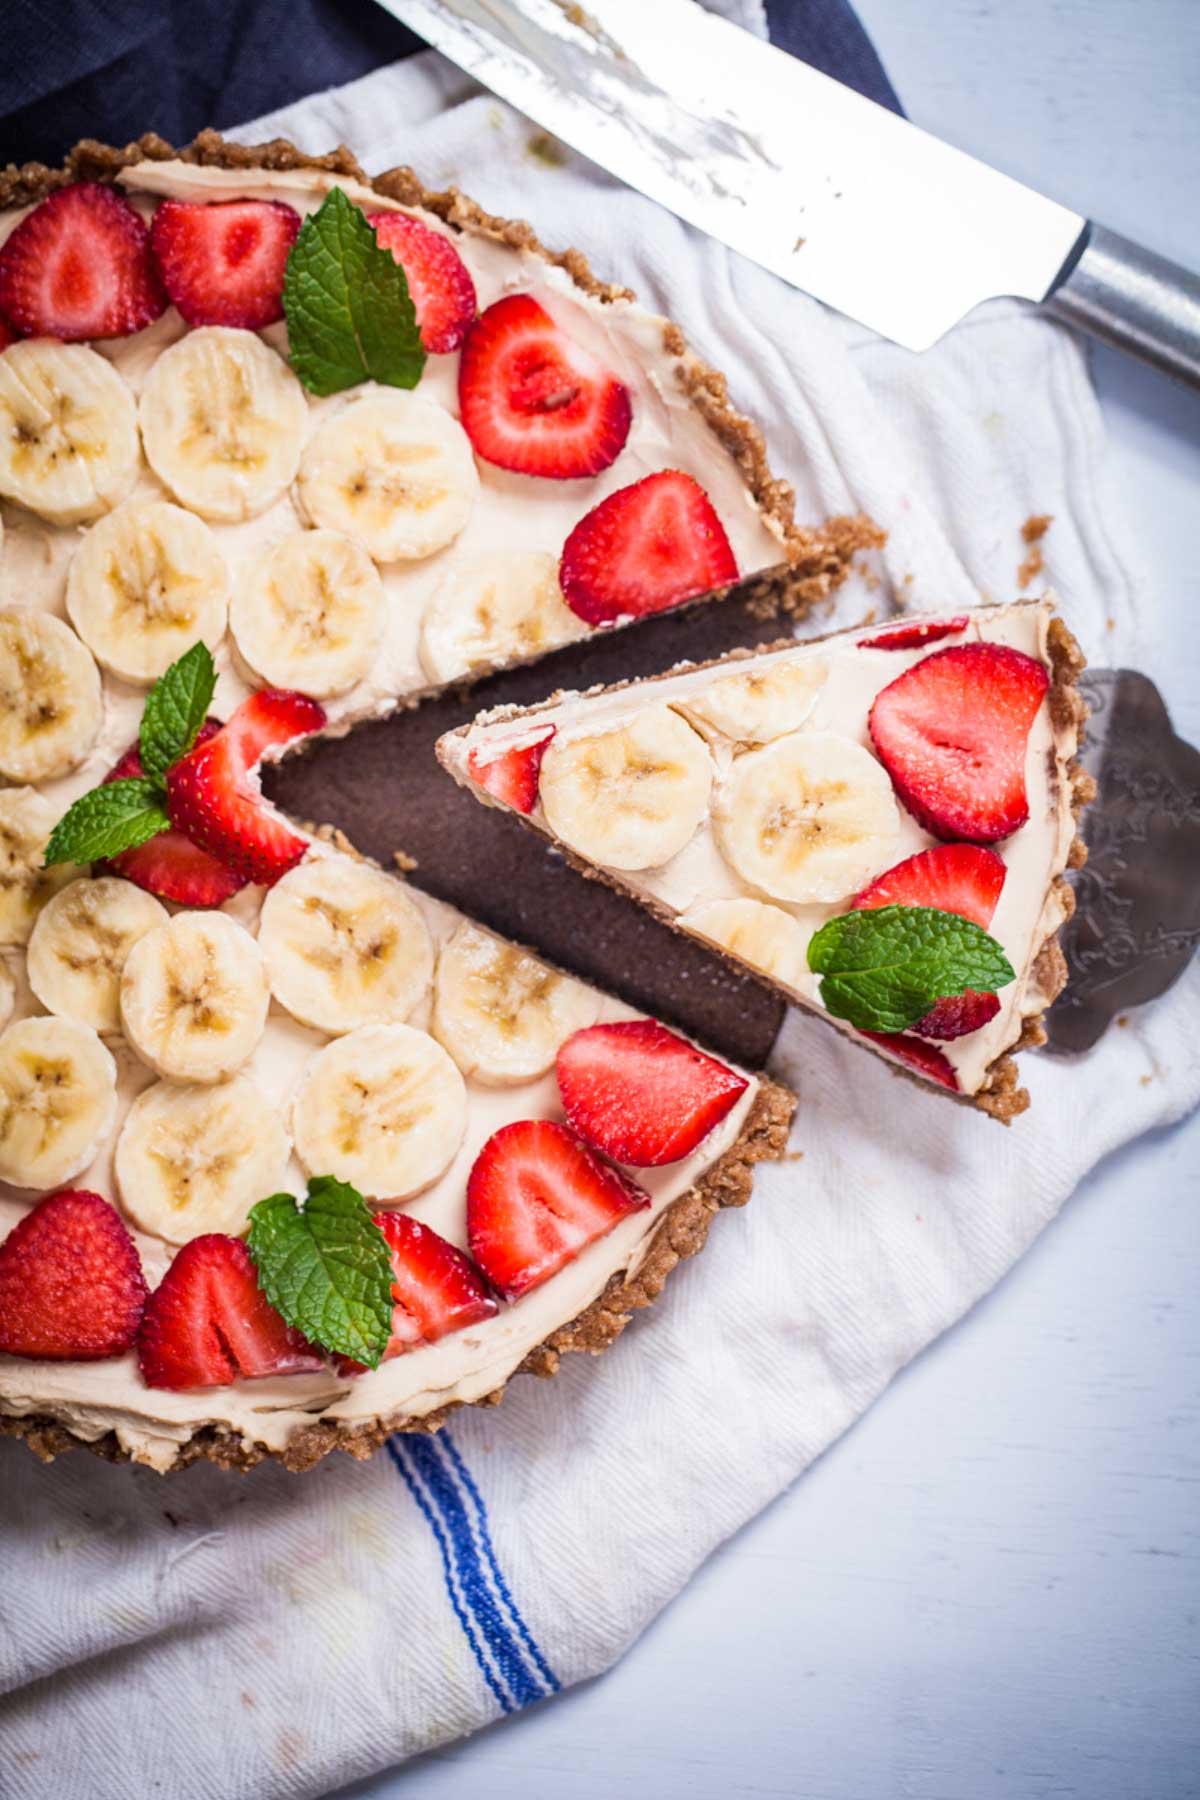
- Fresh Fruit: Bananas and strawberries are a classic topping—the strawberries add brightness and acidity, while the banana brings natural sweetness and a creamy texture. You can also use a mix of berries or seasonal fruit (see suggestions below). Slice the fruit just before assembling so everything stays fresh and vibrant.
- Optional Finishing Touches: A few mint leaves or a sprinkle of lemon zest can add freshness and visual appeal, especially if you're serving this tart for a special occasion.
How To Make It
See the full recipe with measurements in the recipe card

Step One (Picture 1 above) — Blend the Crust: Add the nuts, dates, oats, pumpkin seeds, salt, ginger, vanilla, and coconut oil to a high-speed blender or food processor. Blend until the mixture turns into fine crumbs that stick together when pressed. The mixture will feel warm, sticky, and slightly oily—that’s what you want. Use your hands to form a rough ball and let it cool at room temperature (a few minutes).
Step Two (Picture 2 above) — Form the Tart Shell: Press the crust mixture into a 9-inch tart pan with a removable bottom. Use your hands first, then smooth and compress the crust using the bottom of a glass (optional). Aim for an even layer across the base and slightly up the sides to form a sturdy tart shell. Cover and chill in the fridge while making the filling.
Step Three (Picture 3 above) — Mix the Filling: In a medium mixing bowl, beat the mascarpone cheese using a hand mixer or stand mixer on low to medium speed. Gradually add the sugar and a splash of amaretto, mixing until the mascarpone mixture is thick, smooth, and creamy (a few minutes).

Step Four (Picture 4 above) — Build the Layers: Arrange banana slices evenly across the prepared crust. Spoon the mascarpone mixture over the bananas, then spread it gently and evenly using a rubber spatula or the back of a spoon.
Step Five (Picture 5 above) — Add the Topping: Once you have a thick, even mascarpone layer, finish the tart with fresh fruit. For example, sliced strawberries, bananas, and mint leaves for garnish. Arrange them neatly over the mascarpone filling.
Step Six (Picture 6 above) — Chill and Serve: Cover and refrigerate the tart for a couple of hours, or until the filling firms and slices cleanly. Slice, serve, and enjoy.
Top Tips
- Chill the Crust Before Filling: Once pressed into the tart pan, cover the crust with plastic wrap or parchment paper and chill it while preparing the mascarpone mixture. This helps the tart shell firm up and makes assembly easier. It's optional but highly recommended.
- Add Sugar and Amaretto Gradually: While beating on a low to medium speed, slowly add the coconut sugar and amaretto (optional). This helps the mascarpone mixture thicken properly and prevents it from becoming grainy.
- Adjust the Amaretto Flavor to Taste: The base recipe uses just one tablespoon, which adds subtle depth without being noticeable. If you prefer a stronger flavor, increase to 2 or 3 tablespoons, or leave it out.
- Layer Banana Slices for Extra Creaminess: Adding a layer of sliced banana under the mascarpone filling creates a rich, fruity base and adds a soft, creamy contrast to the buttery crust. Any extras can be used to make my Banana Chia Pudding.
- Press While Spreading the Filling: If you're adding a banana layer, gently press the mascarpone mixture down as you spread it. This keeps the banana slices in place and creates a smooth, even filling.
- Chill Before Serving: It's best to refrigerate the tart for at least 2 hours—overnight is even better. Chilling helps the mascarpone filling set, firms the crust, and makes clean slicing effortless.
Fruit Variations
One of the best parts of this tart recipe is its versatility. Switch things up based on the season, occasion, or what’s already in your kitchen.
- Classic Banana + Strawberry (pixture a below): This is the go-to topping—fresh strawberries add brightness and acidity, while sliced banana gives natural sweetness and creamy texture. Add a few fresh mint leaves for a pretty finish.
- Berry Topping (pixture b below): For a more colorful look, use raspberries or a mix of berries. This variation feels elegant and works beautifully for holidays, summer gatherings, or a July 4th celebration.
- Tropical or Exotic Fruit Mix (pixture c below): For a fun twist, layer sliced banana with dragon fruit, persimmons, passion fruit pulp, or Asian pear. The contrasting colors make the tart feel like a special-occasion centerpiece.
- Fall Variation—Apple-Coffee Topping (pixture d below): A seasonal variation with warm apple slices and a hint of coffee. (Instructions in the recipe card.).

Recipe FAQs
Store the tart in the refrigerator, covered with plastic wrap or in an airtight container, for 4–5 days. If you want the fruit topping to look its best, add it just before serving.
Yes — this is a great make-ahead dessert. Assemble the crust and mascarpone filling a day before serving and refrigerate. Chilling helps the tart firm up and makes slicing easier.
If you're topping the tart with fresh banana slices, lightly brush them with freshly squeezed lemon or orange juice before chilling the tart. The natural acidity helps slow browning and keeps the fruit looking fresh and vibrant. Or add them right before serving.
Cooked fruit works beautifully, especially in fall and winter. The apple–coffee topping included in the recipe card is a great option. Just let the fruit cool completely before adding it.
Yes. Cashews and pumpkin seeds work best, but hazelnuts (especially if you have leftovers from making my Creamy Seed And Nut Smoothie) or pecans are great substitutes. You can also use raw almonds. Keep the ginger—its warmth and brightness help balance the sweetness.
Yes, brown sugar can be substituted for coconut sugar if preferred. The flavor will be slightly sweeter and more traditional.
Other Mascarpone Desserts To Try Next

Made this? Tell me how it went in the comments and leave a star rating below. I love to hear from you. And don't forget to subscribe to my monthly newsletter! — Mariska
Have questions? Simply comment below or message me. If you make this recipe, please leave a comment and a starred review below. Thank you!
📖 Recipe

No-Bake Mascarpone Tart with Fresh Fruit
Mariska RamondinoEquipment
- 1 Stand Mixer with whisk attachment You can also use a large bowl and a handheld mixer.
- 1 high-speed blender like a Vitamix
- 1 rubber spatula You can also use a large butter knife or the back of a spoon.
Ingredients
For the Crust
- 2 cups cashews or hazelnuts or pecans 273 grams
- 1 cup steel-cut oats gluten-free, 189 grams
- ½ cup pumpkin seeds or roasted sunflower seeds 70 grams
- ½ teaspoon salt
- ½ teaspoon fresh grated ginger
- 1 teaspoon vanilla extract
- 7 Medjool dates About 140 grams
- ¼ cup coconut oil 35 grams
Filling and Topping
- 16 ounces mascarpone 455 grams
- 3 tablespoons raw coconut crystals or coconut sugar
- 1 tablespoon amaretto liqueur or more as desired (optional)
- 2 bananas peeled and sliced crosswise
- 1 pound fresh raspberries strawberries, or your fruit of choice (450 grams)
Instructions
Make the Crust
- Place cashews, oats, seeds, and salt in a high-speed blender. Coarsely chop for a couple of seconds on medium speed.2 cups cashews or hazelnuts or pecans, 1 cup steel-cut oats, ½ cup pumpkin seeds or roasted sunflower seeds, ½ teaspoon salt
- Pause the blender. Add ginger, vanilla extract, dates, and coconut oil.½ teaspoon fresh grated ginger, 1 teaspoon vanilla extract, 7 Medjool dates, ¼ cup coconut oil
- Blend everything on the highest speed setting until completely pulverized, and you have obtained a sticky, smooth mixture—use a temper to rotate the ingredients around the blade if you are using a Vitamix.
- The crust will feel at first crumbly, warm, sticky, and oily. Use your hands to form a rough ball and let it cool a bit at room temperature (a few minutes).
- Transfer the mixture immediately to a 9-inch tart pan and evenly press into the pan (careful because parts can still be hot). The crust should feel sticky and oily but more solid.
- Aim for an even layer across the base and slightly up the sides to form a sturdy tart shell. Cover and refrigerate while making the tart filling.
Filling and Topping
- Beat lightly the mascarpone at a medium speed—using a hand or stand mixer.16 ounces mascarpone
- Gradually add the coconut crystals and amaretto (optional). Continue to mix on medium speed until thoroughly combined, and the mascarpone turns into a firm, thick consistency (a couple of minutes).3 tablespoons raw coconut crystals or coconut sugar, 1 tablespoon amaretto liqueur
- Take the tart crust out of the refrigerator and layer with sliced bananas.2 bananas
- Transfer the mascarpone mixture on top of the bananas and, while pressing down (to hold the banana slices in place), evenly spread the mixture to fill the tart crust.
- Top evenly with fresh raspberries (or fruit of your choice).1 pound fresh raspberries
- Cover and place in the refrigerator for at least 2 hours or overnight before serving.
- Keep stored in the refrigerator for up to 4 or 5 days.
Notes
- Core, peel, and slice about 2 to 3 apples crosswise into ¼ inch slices (assuming each apple gets you about 12 slices).
- In a large skillet, melt one tablespoon (coconut) butter.
- Add the apple slices, three tablespoons of brewed coffee, ¼ teaspoon Stevia powder, or coconut sugar to taste.
- Cook and gently stir until apple slices are tender (about 7 to 8 minutes).
- Let it cool, and neatly arrange the apple slices on top of the mascarpone tart with some coffee beans and hazelnuts to garnish.
Add your own private notes
Whenever you come back to this recipe, you’ll be able to see your notes.
Nutrition (% Daily value)
Disclaimer: This nutritional data is calculated using third party tools and is only intended as a reference.
Leave a Reply