
Mascarpone Mousse is a light, creamy, no-bake dessert made with just five simple ingredients — mascarpone cheese, eggs, gelatin, vanilla, and a touch of sweetener. It comes together in minutes, chills until perfectly airy and set, and finishes beautifully with cacao powder and fresh berries. Gluten-free, refined-sugar-free, and low-carb.

Mascarpone desserts have always been part of my family celebrations — tiramisu, panna cotta, and my No-Bake Mascarpone Tart were constant favorites growing up. This mousse keeps that tradition but with a much simpler process.
The mixture comes together in just a few minutes, then chills until light, airy, and perfectly creamy. Elegant enough for a dinner party, simple enough for a quiet Tuesday. Let's make it!
Why You'll Love This Mascarpone Mousse
- Light, silky texture: Whipped egg whites, softened gelatin, and mascarpone cheese create a mousse that’s airy, smooth, and irresistibly creamy.
- Simple ingredients, elegant results: With just a few pantry staples, you get a dessert that feels restaurant-worthy without complicated steps or equipment.
- Make-ahead friendly: This mousse needs time to chill before serving, making it the perfect special-occasion or dinner-party dessert.
- Easy to customize: Finish with fresh berries, cacao, shaved chocolate, or lemon zest for a seasonal twist. It’s versatile and pairs beautifully with many flavors.
Ingredients & Notes
There are only 5 simple ingredients plus the garnishes. Let's look at what you need.
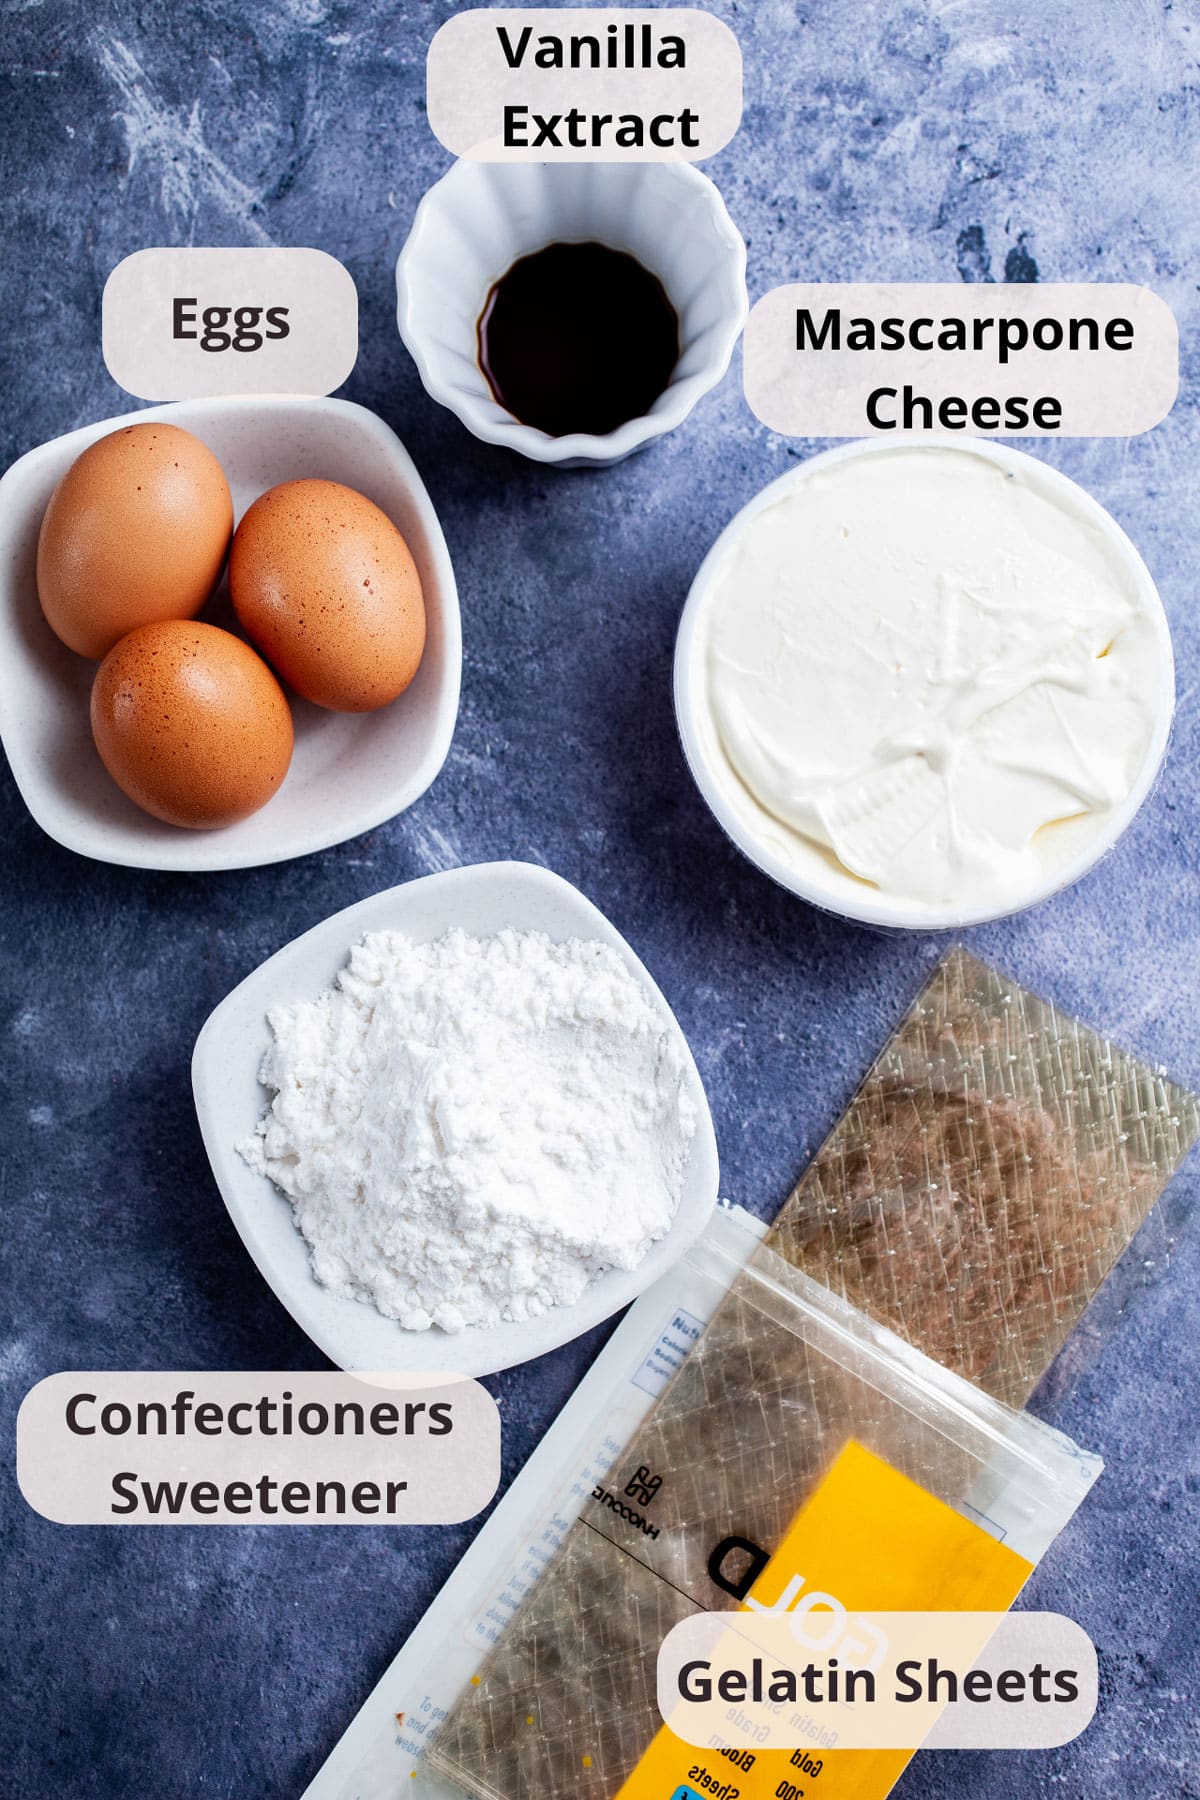
- Mascarpone cheese: You only need one container. BelGioioso is my go-to brand, but any high-quality option works. You’ll usually find it near the specialty cheese section or deli. (And if you have extra, use it to make my Mascarpone Cookies.)
- Gelatin sheets: These help the mousse set to that classic silky-light texture. Use gold or platinum gelatin sheets for a reliable bloom strength and a slightly firm but still soft finish. I prefer sheets over gelatin powder because they dissolve cleanly and have no noticeable taste.
- Eggs: You’ll need three large eggs, separating the yolks from the whites. The egg yolks add richness, while the whipped egg whites help create volume and soft peaks.
- Vanilla extract: A splash of vanilla adds warmth and subtle flavor. It pairs beautifully with cacao powder, fresh berries, or shaved dark chocolate.
- Confectioner's sweetener or powdered sugar: I use Swerve or Lankanto confectioner's sweetener to keep this dessert lower in sugar, but the same amount of regular powdered sugar works just as well if you prefer it.
- Garnishes: Finish the mousse with cacao powder (use the rest to make my Warm Spiced Bone Broth Hot Chocolate)and fresh berries (blackberries or raspberries work especially well). A sprig of mint or chocolate mint gives it a restaurant-style presentation.
How To Make It
Note: Soak the gelatin sheets in cold water for a couple of minutes to soften before starting. The steps below follow the most efficient order so everything comes together smoothly.
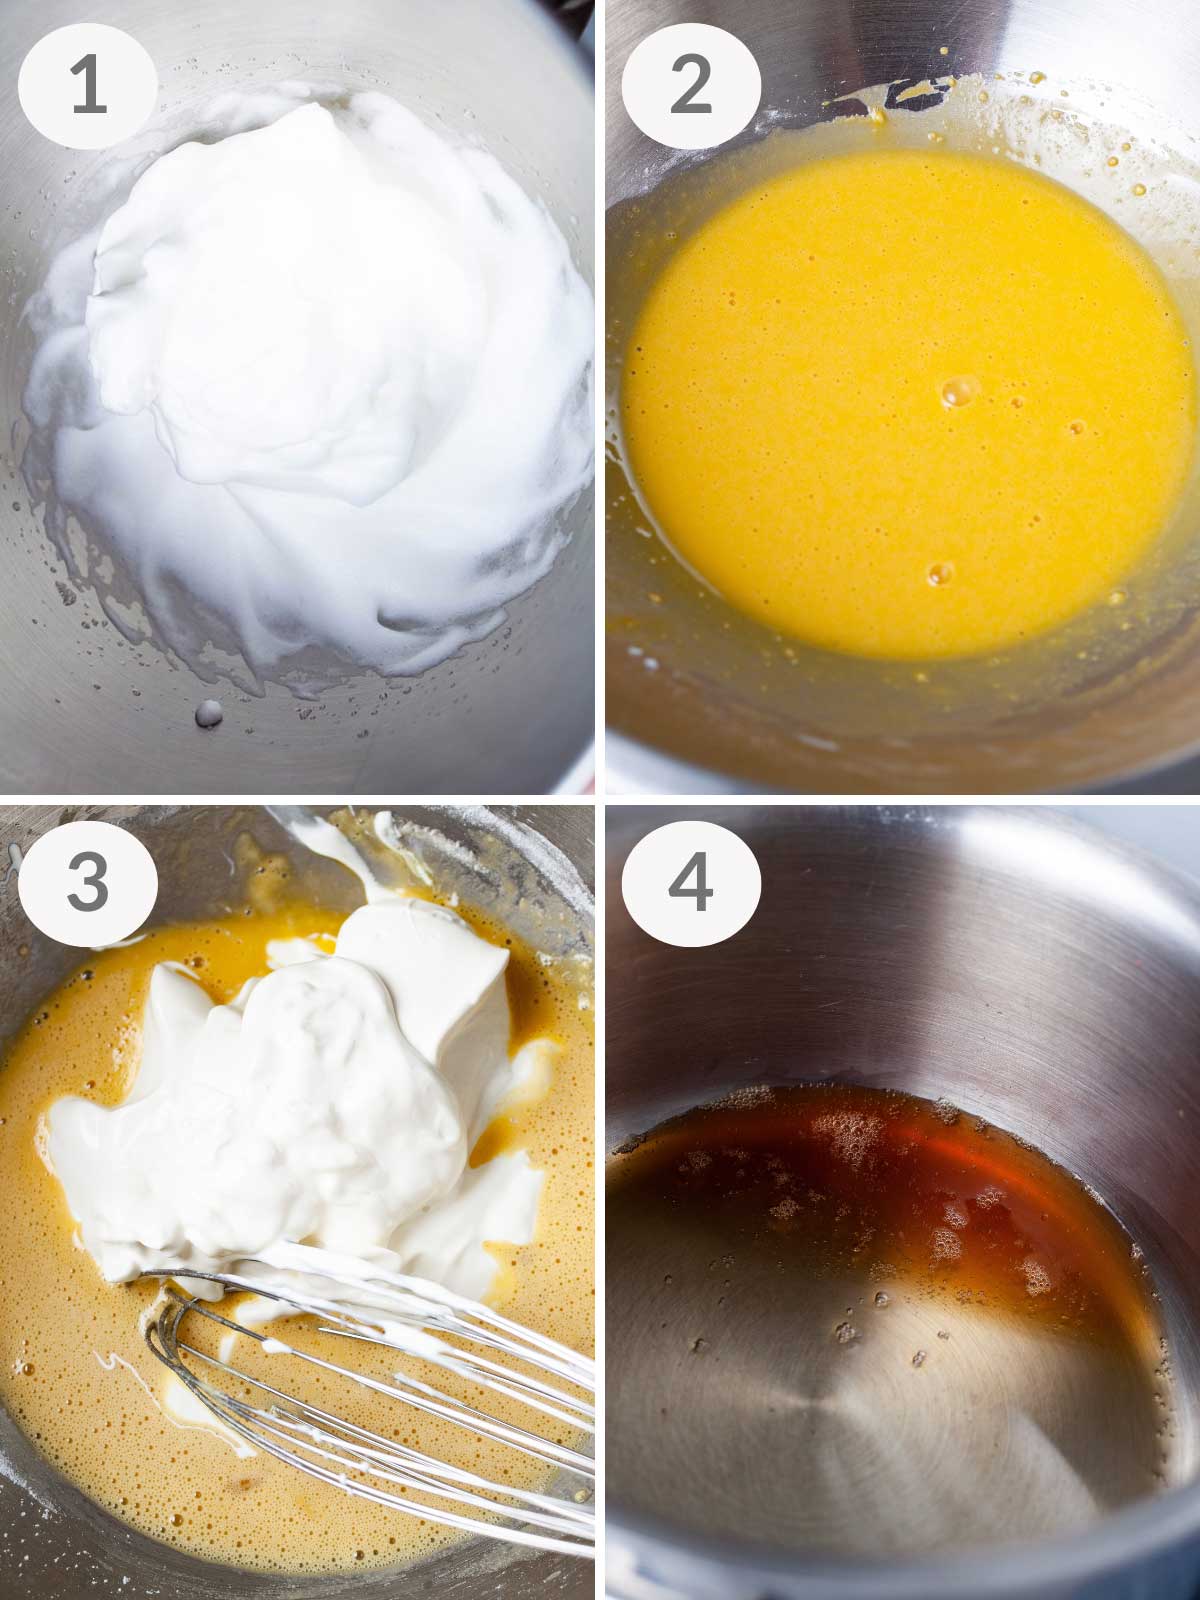
Step One - Whip the egg whites: In a large bowl, using an electric mixer or whisk attachment, beat the egg whites on medium-high speed until stiff peaks form. Set aside.
Step Two - Mix the yolks: In a separate bowl, whisk the egg yolks with the confectioners' sweetener until smooth.
Step Three - Add the mascarpone: Gently fold the mascarpone into the egg yolk mixture with a rubber spatula (or whisk) until smooth and fully combined. Set aside.
Step Four - Melt the gelatin: Once the gelatin sheets feel soft and spongy, strain out excess water. Place the softened sheets in a small saucepan over low heat with the vanilla extract, stirring just until melted—about 30 seconds. You should have a warm, amber-colored liquid.
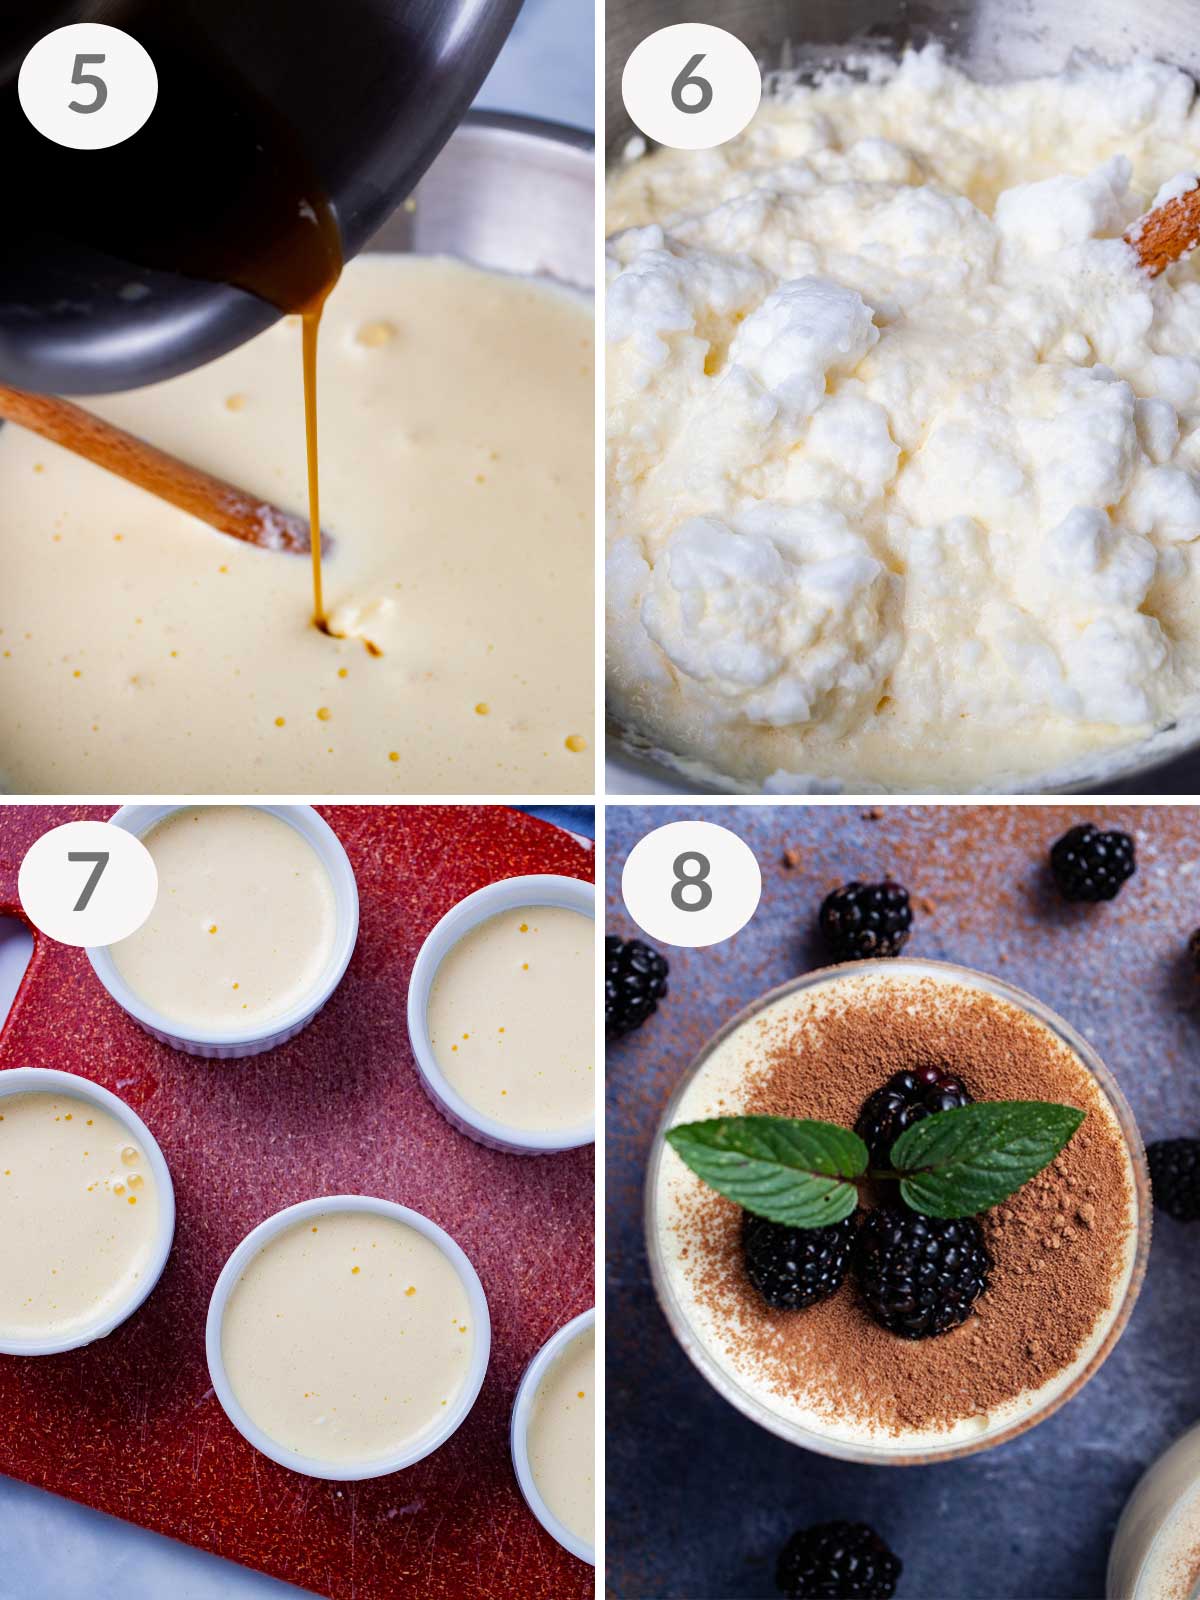
Step Five - Incorporate the gelatin: Slowly drizzle the warm gelatin mixture into the mascarpone mixture—just a little at a time—whisking gently so it dissolves evenly without creating lumps.
Step Six - Fold in the egg whites: Using a rubber spatula, fold the whipped egg whites into the mascarpone mixture. The mixture should become light, airy, and mousse-like.
Step Seven - Portion and chill: Divide the mascarpone mixture into six ramekins or dessert glasses. Refrigerate for at least 5 hours or overnight until set.
Step Eight - Garnish and serve: When ready to serve, dust the tops generously with cacao powder and garnish with fresh berries, shaved chocolate, or mint.
Note: This mascarpone mousse won't have the firm wiggle of a panna cotta. Expect a soft, airy, spoon-ready texture with a delicate creamy finish.
Top Tips
- Use room-temperature eggs: Let the eggs sit at room temperature for 20–30 minutes before starting. You'll get better, more workable egg yolks that will mix evenly with the rest of the ingredients.
- Add the gelatin slowly: When incorporating the melted gelatin sheets, drizzle it in a tiny amount at a time. Whisk gently after each addition to ensure it dissolves fully. Don't rush this, or the gelatin can easily clump.
- Chill long enough to set: This mousse needs time to firm up. Refrigerate for at least 5 hours; overnight yields the best texture.
- Beat egg whites to stiff peaks: Whip the egg whites until firm, glossy, stiff peaks form—not soft or medium peaks. This gives the mousse its light, airy structure.
- Finish with garnish: Always garnish the mascarpone mousse cups. I love to coat them with a generous dust of cacao powder and garnish with (black)berries and some chocolate mint (optional). It will create a beautiful finishing touch.
Storage
- Cover the cups: Once assembled, cover each ramekin (like the ones I use for my Chocolate Coffee Mousse) or dessert glass with plastic wrap or a reusable lid to keep the mousse fresh and prevent it from absorbing other flavors from the fridge.
- Refrigerate: Store the mousse in the refrigerator until serving. This dessert must stay chilled to maintain its light, silky texture.
- Shelf life: The mousse keeps well for 4–5 days, making it a great make-ahead dessert for entertaining or weeknight treats.
Recipe FAQs
Blooming gelatin sheets is simple once you know the order of steps. It helps the mousse set properly while keeping that light, silky texture. Here’s the best way to do it:
Soak in cold water: Place each sheet into a bowl of cold water one at a time. This prevents them from sticking together and ensures they hydrate evenly.
Soak for 2-5 minutes: The sheets should become soft, flexible, and spongy.
Squeeze out excess water: Gently press out the extra moisture—discard the soaking water.
Melt gently: Place the softened sheets in a small saucepan with the vanilla extract over low heat. Stir continuously for about 30 seconds, just until dissolved into a smooth liquid.
Avoid overheating: The gelatin should melt, not simmer or boil—too much heat can prevent it from setting later.
Add immediately: Once melted, remove from heat and drizzle it slowly into the mascarpone mixture while gently whisking so it blends smoothly without clumping.
Tip: Only melt the gelatin right before adding it.
Getting the egg whites properly whipped helps create the light, airy texture in this mousse. Here’s how to do it successfully:
Start with room-temperature eggs: Let the eggs sit at room temperature for about 20–30 minutes before separating. Warmer whites whip faster and gain more volume.
Use the right bowl: Choose a clean metal or glass bowl. Any oil, moisture, or residue will prevent the whites from whipping.
Separate carefully: Even a small amount of egg yolk can interfere with stiff peaks—crack gently and separate slowly.
Use a whisk attachment: A stand mixer or electric hand mixer works best. Beat on medium speed at first, then increase as the mixture thickens.
Look for stiff peaks: The whites are ready when they look glossy and the peaks stand straight up on the beaters without collapsing. This usually takes about 5 minutes.
Yes. If you don’t have gelatin sheets, powdered gelatin works. Use about 1 teaspoon of powdered gelatin per sheet.
Bloom it in cold water, then melt gently with vanilla extract before adding it to the mascarpone mixture (the same way you would with sheets).
More Creamy Mascarpone Desserts To Try Next


Made this? Tell me how it went in the comments and leave a star rating below. I love to hear from you. And don't forget to subscribe to my monthly newsletter! — Mariska
📖 Recipe

Mascarpone Mousse (Light, Creamy & No-Bake)
Mariska RamondinoEquipment
Ingredients
- 2 sheets gelatin softened
- 3 eggs yolk and whites separated at room temperature—see note
- ½ cup Swerve confectioners sweetener + 1 tablespoon extra 60 grams
- 8 ounces mascarpone cheese 1 (226-gram) container
- 2 teaspoons vanilla extract
- Cacao powder, blackberries, and chocolate mint to garnish (optional)
Instructions
- Soften the gelatin sheets by placing them in a bowl covered with cold water for about two to 5 minutes or until spongy.2 sheets gelatin
- Meanwhile, separate the yolks from the whites.3 eggs
- In a bowl of a stand mixer (or use a hand mixer), add the egg whites and mix on a medium to a high setting until stiff, reserve.
- In a separate bowl, mix the egg yolks with the sweetener. Then gently fold in the mascarpone cheese until smooth and well combined, reserve.½ cup Swerve confectioners sweetener + 1 tablespoon extra, 8 ounces mascarpone cheese
- When spongy, strain the gelatin sheets and place them in a small saucepan with the vanilla extract over the lowest heat setting.2 teaspoons vanilla extract
- Stir for about 30 seconds until the sheets have melted and you have a brown vanilla-like liquid.
- Pour the melted gelatin-vanilla mix into the reserved mascarpone mixture in small batches (drips). Use a whisk to stir each batch of gelatin liquid gently until completely dissolved into the mascarpone mix.
- Continue until all the melted gelatin is completely incorporated. Don’t rush this and work in small batches because the gelatin can otherwise easily clump.
- Then, fold the stiffed egg whites into the mascarpone mix. The mixture should become airy.
- Divide the mascarpone mixture equally into 6 ramekins or glasses. Store in the fridge for at least 5 hours, preferably covered, best overnight.
- When ready to serve, pour a generous amount of cacao powder into a small sifter and gently shake it back and forth over the desserts to create a fine coat—be generous with the cacao powder.Cacao powder, blackberries, and chocolate mint to garnish (optional)
- Top it off with (black)berries and some chocolate mint (optional).
Notes
- Eggs and mascarpone cheese: It’s best to take them out of the fridge 30 minutes beforehand to let them come to room temperature.
- Sweetener: You can use regular confectioner's sugar instead of Swerve (sugar replacement) if preferred—know that the nutrition information provided below is calculated using a zero-sugar sweetener like Swerve or Lankanto.
Add your own private notes
Whenever you come back to this recipe, you’ll be able to see your notes.
Nutrition (% Daily value)
Disclaimer: This nutritional data is calculated using third party tools and is only intended as a reference.
Leave a Reply